Showing posts with label diy. Show all posts

Sunday, February 5, 2012

A peek at what I've been up to...


Come on in...I am meeting with my handyman tomorrow to discuss shelving for my studio closet of dreams, but I did promise you a peek last week, didn't I?  So come hither and let's get a feel for what's been going on.

Old Victorian front door, pulled out of a neighbor's dumpster pressed into service as my closet door (after MUCH restoration by DH I must add).  A pretty lacey stencil added to maintain a little visual screen...and I already had the stencil on hand from a project from 10 or 12 years ago.  YES!


I am SO pleased with how it turned out, even though it isn't "perfect".  Neither am I, so we go together!


Dare I say it?  An ORGANIZATIONAL system is in place on one side of the closet for my pretty papers and other altered art supplies.  I dream that it will stay organized.  Time will tell I'm sure!


Functional display pieces FINALLY serving the purpose I intended oh-so-long-ago when I began collecting them.  I think I'm in love...

Pretty storage up close and personal.


The back wall which will have shelves.  I love it.  Getting my inspiration here led to the relentless pursuit of vintage wallpapers for a few years. ("inspiration" might be a bit of a stretch-I copy-catted plain and simple.  Pam Garrison, you rock and just remember that imitation is the sincerest form of flattery).  Just between you and me, I MIGHT have gotten a little carried away collecting the papers as I think I could completely paper several closets .Insert sheepish Judy grin here. Luckily, I have discovered that doing mixed media projects with old wallpapers is WAY fun!  Yes, you are correct, much of the pretty papers will be blocked, but the goal is to have what's sitting on the shelves be pretty too.  I have some awesome storage containers waiting. 

Love the very functional plug in the middle of the wall.  I have a reason for putting it there which you will just have to wait to see.  I tried to pretty it up as much as possible.  If it bothers me, I may cover it with wallpaper too!  I'm just afraid I might not be able to find it again!  LOL!


Well, that's all you get for now.  Cross your fingers that the handyman can start this week on those shelves and then I'll do a full reveal of the finished project as soon as possible.
Until next time,


Pin It!

Thursday, October 27, 2011

Black & White Spooky Tablescape


Welcome to my first ever tablescape post.  I fear it could be addictive.  What do you think?


It all started when I purchased this set of creamy white owl napkin rings in one of my favorite little junk shops.  I started looking at the thrifts for black or black and white dishes to add some pop to my almost 30 year old Mikasa dishes and found 6 of these little cuties for a couple of bucks.


I started getting the idea of using the white owls as a more subtle table dressing.  THEN I saw the little mercury glass owl in West End's catalog with 50% of the purchase price going to St Jude's Hospital for cancer research.  Being a mom of a kid with leukemia (in remission), that sealed the deal and West Elm got my $14 which included shipping, by the way.  I put him in a little birdcage cloche that I previously got from WUSLU deal a day (don't get me started on that-too much fun, too cheap, and way too easy to buy).  He nestled in with some reindeer moss from last Christmas and some little white pumpkins.  As you can see, several items are stacked to make the centerpiece with the bottom being a bride's basket that I've had for years.


My friend Michelle made the adorable tombstone tag that hangs from the top of the cloche.  She took actual photographs from when she was visiting an old cemetery and made a set of these great hangtags.  LOVE THEM!  They almost look 3 dimensional...


Candles from last year topping old faux mercury glass curtain tiebacks I've had and used forever.


I was unsuccessful at finding something resembling cute black napkins or black and white napkins and I wasn't in the humor to spend a lot of money, so at the aforementioned thrift store, I found some black linen looking fabric for $2 and proceeded to make my own, using my late mother's sewing machine with the nifty little embroidery feature.  I then made my own stencil of an owl.  I was so proud...until I put the napkins in the rings and realized it was too much owl. Sigh...back to the drawing board.  On the opposite corner, I stamped the word "Spooky" and called it good. And now I can use the owl corner or the "spooky" corner.  Seriously, that's like 4 hours of my life I'll never get back again, but it's DONE!  YAY!  And thrifty touches like that allow me to splurge on more fun things, right?


Napkin Option "Deux": 


Oh no, I DIT-UHNT?!  Oh yeah, I did...a PAPER stencil.  Desperate times call for desperate measures...and the price was right, just one piece of printer paper.


The adorable place cards seen best at the top of the post were fashioned from an owl graphic from (where else?) Graphics Fairy. Glossy computer paper, stuck on black cardstock folded in half to make a tent card (I think that's what they're called).


What to do for a tablecloth...trip to another favorite junk shop where a favorite textile vendor had a black and white striped twin flat sheet for $6, everything in the booth...40% off.  Yeah baby, now we're cooking with gas...top it with one of my antique tablecloths, marginally ironed, and you've got TABLESCAPE, baby! Woo! Hoo!  Of course, mismatched silver plate is always a favorite in my house. 


Next project, black and white coasters.  Only one is done so far, but I think they will be used for more than Halloween, so we can talk about them more another time.


A fun hors d'oeuvre or sushi set from West Elm.  One of those splurges you can have when you aren't out buying tablecloths and napkins (that's what I'm telling myself anyway).


If you have gotten this far and your eyes haven't yet glazed over, THANK YOU!  Now go on over to Between Naps on the Porch and look at some pros at Tablescape Thursday.  I'm linking up with their party this week.  It should be fun.


Until next time,


Also linking up with the following parties this week:
Feathered Nest Fridays
Vintage Inspiration Friday
Farmhouse Friday
Wow Us Wednesdays
Show and Tell Friday
Tuesdays Treasures 
Funky Junk's Saturday Night Special
Pink Saturday 
Open House Party at No Minimalist Here 
Home Sweet Home Friday 
Tutorials and Tips 
Air Your Laundry Friday
Graphics Fairy Brag Monday
Pin It!

Tuesday, December 21, 2010

Peace on Earth

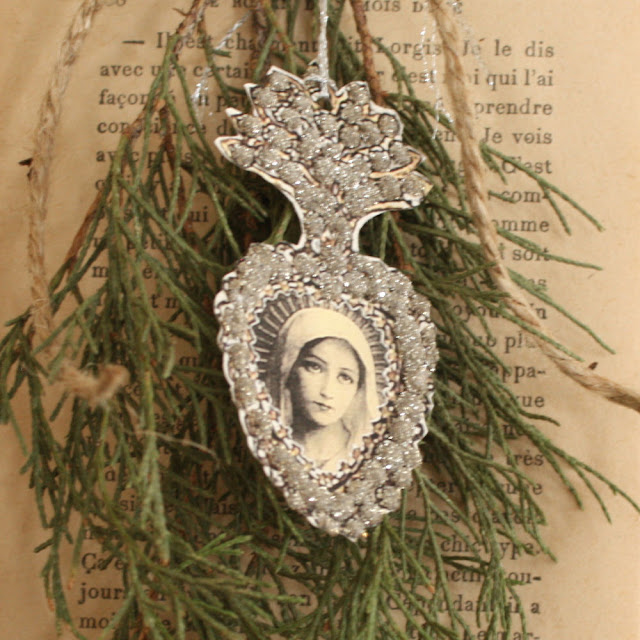
Paper ex-voto tag from Ozma of Odds
Well, I just couldn't stand to miss a White Wednesday, but I'm going to make it short. With Christmas being so close, I have many things on my to do list just like all of you and I need to hang with my cute little babies while I can while they are off from school.  But I digress... I had a few "funny" areas in my home where I needed something to decorate with, but had neither the money nor the desire to go out and purchase something more (really, I have about 6 large boxes of Christmas fodder, do I really need more???).  SO, in the spirit of an ailing economy and burgeoning creativity, I decided to use what I had on hand.  I know, what a concept, you gals have been doing it with great success for ages.  Some of us are a little slow sometimes.  Anyway, I decided to put into play a couple of the awesome things I bought from Etsy sellers Ozma of Odds and Petite Michelle Louise (thank you Blogland for introducing us!).  I have this wonderful antique brown book called Christmastide which I purchased a few years ago.  I just loved the color and the graphics on it.  Like so many of you, I also have cloches that I love to find a use for.  I also have this little creamy pair of children's gloves that I have had for years and always find a use for in my wintery decor. I also have a glittered tree topper from Wendy Addison which has aged beautifully.  I put them all together and....voila!  Christmas vignette.  I washed up a jar from some jalepenos that were almost gone (now you really are privy to all of my secrets) and circled it with some torn muslin, twine, and the sweet Madonna piece I got from Petite Michelle Louise.  Add a little greenery and pinecones from my backyard and we have a completed bookcase topper.  And the best part is, ZERO cost. 


Then, I had a little spot that needed a little somethin-somethin, so I hung one of the mirrors that is normally layered on my mantel and an old French book page with some greenery from the yard, more twine, and the ubiquitous paper tag from Ozma of Odds (yes, Rosemary, you have hit a home run with this one, your tags are EVERYWHERE.  And I love mine!).  I decided to go the simple route and used a silver thumb tack to stick it on the wall.  Turned out pretty cute I think and again, ZERO dollars.  Of course, I had purchased the tags previously, but the thing is, no additional cost.

Well, that's what I did.  I hope you like it.  On a personal note, Mr FL has a job interview on Thursday.  If you've got a minute to say a little prayer that it is a good fit for him, I'd sure appreciate it.  We need the money, but he needs to be able to enjoy it as well.


I'm linking up to Kathleen's White Wednesday party, so swing by when you can.  There are some awesome posts.

Until next time,


One quick photo I took last night in my backyard of the very cool Winter Solstice Full Lunar Eclipse.  Woo! Hoo!
Pin It!